
A lead types marina@gmail.con into your form and lands on your ActiveCampaign list. The welcome email bounces, and the address stays in your contact database. Repeat that across a few hundred signups and you have a list-quality problem before your first campaign even starts.
ActiveCampaign email verification works best when it runs the moment a contact enters your automation, so you can decide what to do with the result before the first send. This post shows how to set that up with the Easy Email Verification app for ActiveCampaign, what gets written to the contact, and how to route contacts based on verification results before the welcome sequence starts.
Table of Contents
Verify on entry, not only before a campaign
Cleaning the list before a big campaign still matters, and we walked through it in the post on bulk email verification. But the contact with a typo signs up today, and the welcome sequence fires today. If verification happens once a quarter, that contact’s first emails have already gone nowhere.
Then there’s your ActiveCampaign bill. For accounts created on or after November 3, 2025, the contact limit counts every contact, including bounced, unsubscribed and unconfirmed ones; older accounts only count active contacts, according to the ActiveCampaign help center. Hitting that limit has a practical effect: automations keep running, but “Send an email” actions are skipped and nothing goes out, as the contact limit article explains. Addresses that don’t exist push the account toward that ceiling.
Can ActiveCampaign verify email addresses automatically?
With a verification app, yes. The Easy Email Verification app is an action in your automation. When a contact goes through it, the address is verified and the result is written to custom fields on the contact, ready to use in conditions:
| Field | What it holds |
|---|---|
| Result | valid, invalid or unknown |
| Reason | Why, for example accepted_email or no_mx_record |
| Safe To Send | true or false: the overall send recommendation |
| Disposable, Role, Free, Accept All | Risk signals: temporary inbox, team address (info@, sales@), free provider, catch-all domain |
| Did You Mean | A suggested fix when the domain looks mistyped |
| User, Domain, MX Record, MX Domain | Technical details of the address and its mail server |
How to set up ActiveCampaign email verification
The video below shows the full installation. The same walkthrough, with one video per step, is in the ActiveCampaign setup guide.
- Create a free Easy Email Verification account and an API key under Integration → API Settings. Give it a name you’ll recognize, such as
activecampaign. - Create the 12 fields in ActiveCampaign. The EEV dashboard has a button that creates them all at once; by hand it’s Lists → Manage Fields, all Text Input.
- Under Apps, search for EasyEmailVerification, add the account with your key and map each result field to the custom field with the same name.
- Add the Easy Email Verification action to your entry automation.
- Optional, to fix typos: copy the ActiveCampaign API URL and key (Settings → Developer) and save them under Integration → ActiveCampaign Integration in the EEV dashboard, using the same name as the key from step 1.
The test: four addresses through the API
To show what verification returns, we checked four addresses on November 13, 2026 through the Easy Email Verification API, which returns the same fields the app writes to the contact. One address is real (our support inbox). The other three are test addresses representing typos and an inconclusive check.
| Result | Reason | Safe To Send | Role | Did You Mean | |
|---|---|---|---|---|---|
support@easyemailverification.com | valid | accepted_email | true | true | |
contato@gmail.con | invalid | no_mx_record | false | false | contato@gmail.com |
marina.costa.eev2026@yaho.com | invalid | invalid_mx_record | false | false | marina.costa.eev2026@yahoo.com |
x7q.eev.no.box.2026@outlook.com | unknown | temporarily_blocked | false | false |
And this is a test contact after going through the automation:
The support@ inbox exists and got Safe To Send: true, but it also came back Role: true: it’s a team inbox, not a person. Whether that kind of address belongs in a one-to-one sequence is your call.
Both typos came back with a suggestion. With automatic correction on (step 5), the app replaces the contact’s email with the suggested address and verifies it again. If the corrected address already exists in the account, the contact is tagged easy-email-verification-duplicated instead of being changed.
The Outlook check was temporarily blocked by the server, the result was unknown and no credit was charged. That contact is neither valid nor invalid: it needs another attempt.
What each result and reason means is covered in the post on email verification results.
The entry automation, with four paths
Here’s one way to route new contacts based on the verification result before the welcome sequence:
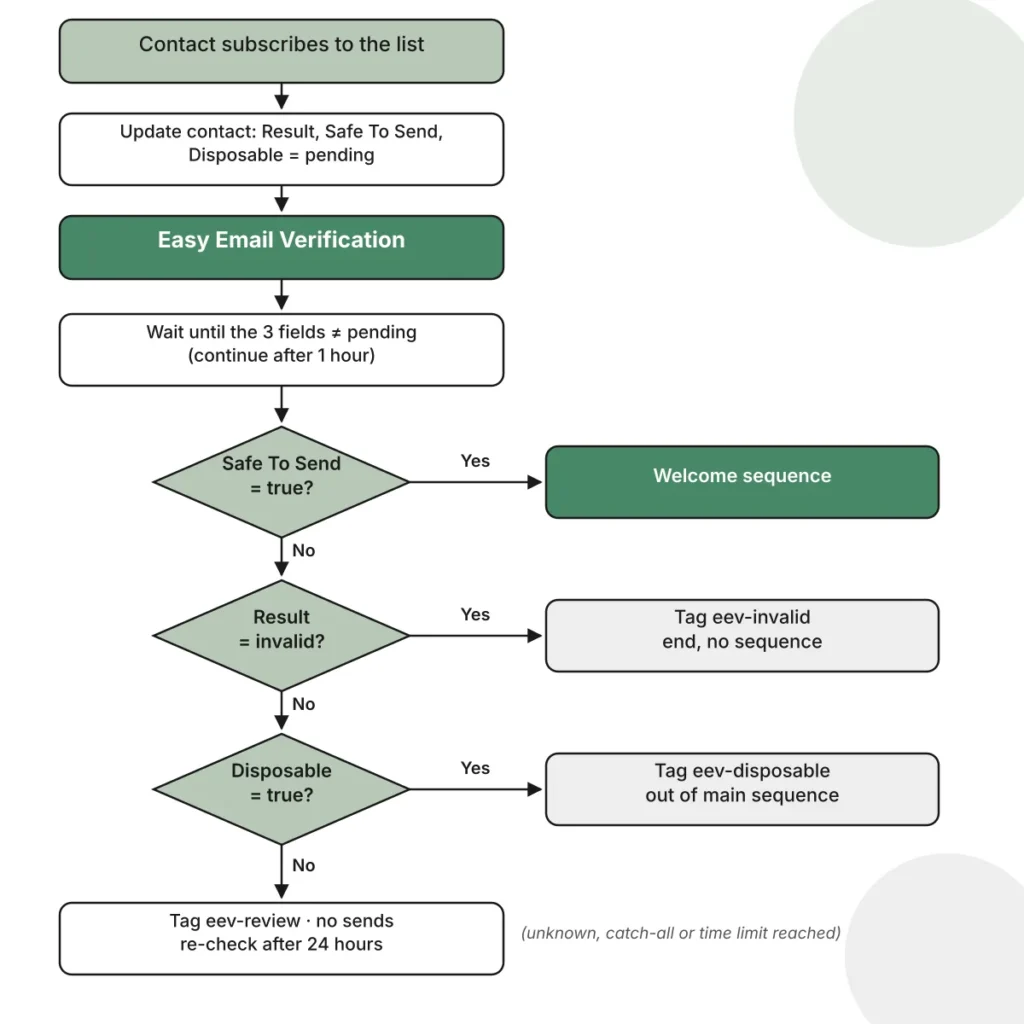
- Trigger: contact subscribes to the list. This also works with third-party forms, which don’t fire the “Submits a form” trigger.
- Update contact: set Result, Safe To Send and Disposable to
pending. That way no value from a previous check can let the contact through by mistake. - Action: Easy Email Verification.
- Wait until Result, Safe To Send and Disposable are all different from
pending, with “Continue automation if conditions are not met” checked and a one-hour limit. Waiting on all three fields, not just Result, makes sure the decision uses data from the same check. The contact moves on when the result arrives or the limit expires, whichever comes first, as described in ActiveCampaign’s help on wait actions. If time runs out, the fields still readpendingand the contact falls into the last path. Before switching the automation on, run a test contact through it and check the fields on the record. - If Safe To Send is
true→ welcome sequence. - Else if Result is
invalid→ tageev-invalidand end, no sequence. Exclude that tag from your campaign segments. - Else if Disposable is
true→ tageev-disposable, out of the main sequence. The address may exist; what to do with it depends on your commercial policy. - Else (unknown, catch-all or timed out) → tag
eev-reviewand no sends. For a block or timeout, a new check after 24 hours may return a conclusive result, and an attempt with no answer isn’t charged.
These are text fields: in the condition, compare with the word true or invalid.
Double opt-in changes what verification catches
With an ActiveCampaign form that uses double opt-in, the contact only enters the automation after clicking the confirmation email, as the ActiveCampaign help center explains. That email is the subscription confirmation, sent before the automation, and it isn’t part of your marketing sequence.
This filters out many mistyped and unreachable addresses before verification runs. It doesn’t eliminate every address-quality risk, though: a mistyped address can belong to someone else, who may confirm it. And it doesn’t replace verification for contacts added through imports, the API or other integrations. A catch-all that confirmed shows someone has access to that inbox; whether that’s enough to clear it for sending is a policy decision, not an automatic rule. Without double opt-in, leave catch-all contacts to your sales team to decide case by case.
Why Safe To Send matters more than Result
Checking only Result = valid may seem sufficient, but it lets a valid address from a temporary inbox through. Safe To Send combines the result and the risk signals into one decision. Our recommendation: use Result to separate the invalid ones and Safe To Send to clear a contact for sending. Neither replaces consent: valid means the inbox exists, not that the person wants your email or that the message will reach the inbox.
Automatic correction: test before you turn it on
Correction fixes the domain, not the rest of the address. marina@gmial.com becomes marina@gmail.com, but nothing proves that Gmail inbox belongs to the Marina who filled in the form. For low-risk signup flows, automatic correction may be useful, but it should be tested carefully. For account registrations, purchases or messages containing personal information, ask the contact to confirm the correction before sending.
Unsubscribe, archive or delete
Tagging and unsubscribing take the contact out of your sends and keeps the history. Archiving takes it out of your plan count, but only admins can do it, from the contacts screen. An archived contact is read-only for up to one year and then deleted, and it can only be restored after 30 days, per ActiveCampaign’s archiving article.
So archive in batches, every so often, filtering by the eev-invalid tag, and check first that no customer with a purchase history is in the group. Deleting is permanent; for invalid contacts, unsubscribing or archiving is usually enough.
What about the list already in ActiveCampaign?
The automation handles new contacts. For the ones already in the account you have two options: export the list and run bulk email verification, or push the current contacts through the automation. The automation is simpler when you want the result straight in each contact’s fields. The bulk file is better when you want to see the whole list before you touch any record.
If the fields don’t fill in
- Empty fields: check the mapping from step 3, each result field linked to the field with the same name.
- “Webhook is not registered” or the app won’t connect: remove the account in the ActiveCampaign app and add it again with your key.
- Typo correction does nothing: the name saved under ActiveCampaign Integration must match the API key name exactly.
What it costs
A conclusive verification uses 1 credit. Inconclusive answers from a timeout, error or block, like Outlook in the test, are free. When automatic typo correction runs a second verification, the two checks use 2 credits in total. A catch-all returns unknown with reason accept_all and uses 1 credit, because the server answered.
New accounts get 200 free verifications, no card required. With pay-as-you-go packs, which never expire, it works out to between $0.004 and $0.008 per contact, as listed on the ActiveCampaign integration page.
Next step
Create a free account, generate an API key and connect the app following the ActiveCampaign guide. Then add one test contact with your own address and another with a mistyped domain, and check the fields on both records. Pricing and the FAQ are on the ActiveCampaign integration page. To check a single address, use the free email checker.
Related posts
- How to clean a 50,000-contact email list before a campaign
- Valid, invalid, unknown: what each email verification result means
- Black Friday email marketing 2026: how to keep your emails out of spam
See all posts on the Easy Email Verification blog
Illustration by Storyset